Neither of us have attempted anything like this before, but we'd read the DIY sites and some tiling books and had talked to the guys at the tile store to get their advice, so we figured we would be okay. And, ultimately, we were, despite our best efforts otherwise.
As I mentioned, we chose white subway tile of the sort that doesn't need additional spacers, cause the grout spacing is built into the design of each tile. However, because of the dimensions of the room, we knew we'd have to cut tiles in order to fit in the corners. So we bought a cheap tile cutter and learned how to use it. So while the wife cut tile, I was slapping them on the wall I'd freshly coated in a troweled layer of mastic and then trying to make sure they remained level and plumb. It wasn't easy. We had to start the first row a quarter inch off the tub itself to allow nails sticking out of the flooring and joists on which one might gouge one's head.
Upon my arrival at the site, I could see we were in trouble. The drain for the new tub sits in a somewhat different place than the old one, being as the drain itself is a bit further back from the wall and requires a long pipe to connect to the upper drain and then down into the plumbing. From my place beneath the tub, I could see that the drain was resting within a notch cut half-way into one of the floor joists. It wasn't touching the upper edge of the notch, but that was the surface that prevented the elbow we had to install into the drain from fitting. Because of the cramped nature of the area, I couldn't get my sawsall in there to carve any more of it out. That being the case, I knew I would probably have to cut through it using a piece of broken hack saw blade, which I also knew would take all afternoon.
After hacking at it for a bit, I came to another realization. In order to fit that elbow, it seemed to me that most if not all of the rest of the joist would have to be cut away. Before actually doing this, I went to fetch the wife hoping her advice would be sound. She crawled down there with me to look at the problem and decided that what we really needed to do was to chisel out more of, but not all of, the notch until we could fit the elbow in. As we don't own a chisel, we had to use a medium-sized nail-puller/crow bar and a block of stray wood to whack it with. It took a while with the both of us laying on our backs and trading striking duties from different angles, but we finally chiseled through enough to get the elbow in straight. Some PVC cement products were applied and the whole thing was ready to go.
But was it leakproof?
We had planned to use our first test-drive of the tub as a chance for the wife to take a nice soak, but instead we opted to just fill the tub with cold water. Once it had nearly reached the upper drain, I went out and crawled back under the house to check for leaks. I could see that it was leaking even before we tested the upper drain. Water was seeping out of the lower drain--not in a steady stream, but at least a good steady drip. Already it had puddled on the plastic beneath the house. Apparently when the tub drain had been knocked to one side it had lost some of its seal-power. Go figure.
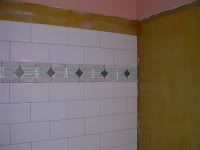
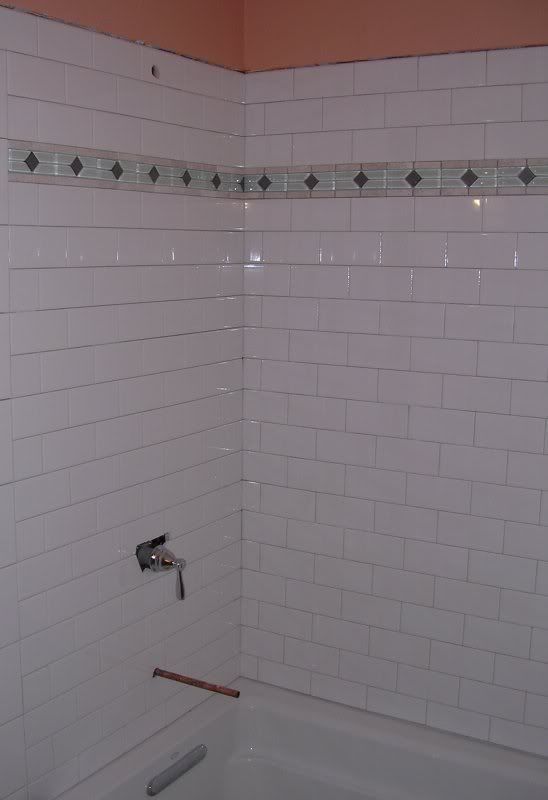
Fortunately, according to the website of the plumber's putty we'd used, the stuff takes a good couple of days to fully set so we were still within a window during which we could remove the putty, reset the drain and seal it anew. And, after letting all the water out, this we did--the wife from above and me assisting from beneath the floor.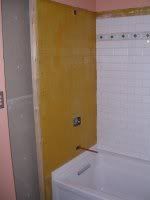 for proper sealing later, but the whole row kept sliding ever so slightly down the wall, dropping below the level start line I'd drawn. We finally had to prop them up with pieces of tile from one of our failed cutting experiments. In the end, though, they did stay put and gave us a level foundation that I was able to start building on. By the time I reached near the top, we decided to put in a decorative row of stone, glass and metal tiles, the stone of which matched our new floor tiles.
 I hit some more trouble on one of the side walls when I began relying more on the eyeballed vertically level nature of the tiles themselves and less on the carefully measured vertical line I'd drawn before starting the wall. By the time I reached the top the tiles were well inside the line. When I pointed out to the wife how strange this looked, she pointed out that I'd done it wrong. Fortunately, the mastic had not set and we were able to scoot the rows to the line, then cut new tile for the corner pieces.
The opposite wall, the one with the tub spout, valve handle and shower head, also proved a bit tricky, but nothing we couldn't tackle together.
By the time the basic surround was finished, we'd used four boxes of tile and had one full box remaining to take back to the tile store.
 The bullnose came in this weekend and we set about installing them. This became even trickier, because we only had around 72 pieces of it, leaving very little room for screw ups. Then, due to the screwups that then ensued anyway, we wound up using every last piece we had down to the scraps. We got it all in there, though, and it looks pretty darn good.
Now all we have left is the sealing of the tub, the grouting of the tile, the tiling of the floor, the grouting of the floor tile, some drywalling, the replacement of the ugly plumbing that will be exposed beneath the new sink vanity, the installation of said sink and vanity, the installation of the toilet, towel shelf and shower curtain and the painting.
The further along we get in this project, the less work we feel like doing on the hall bathroom. By the end, we'll probably be in a mood to slap some new paint on it and call it a day.
We had planned to use our first test-drive of the tub as a chance for the wife to take a nice soak, but instead we opted to just fill the tub with cold water. Once it had nearly reached the upper drain, I went out and crawled back under the house to check for leaks. I could see that it was leaking even before we tested the upper drain. Water was seeping out of the lower drain--not in a steady stream, but at least a good steady drip. Already it had puddled on the plastic beneath the house. Apparently when the tub drain had been knocked to one side it had lost some of its seal-power. Go figure.
Fortunately, according to the website of the plumber's putty we'd used, the stuff takes a good couple of days to fully set so we were still within a window during which we could remove the putty, reset the drain and seal it anew. And, after letting all the water out, this we did--the wife from above and me assisting from beneath the floor.
 for proper sealing later, but the whole row kept sliding ever so slightly down the wall, dropping below the level start line I'd drawn. We finally had to prop them up with pieces of tile from one of our failed cutting experiments. In the end, though, they did stay put and gave us a level foundation that I was able to start building on. By the time I reached near the top, we decided to put in a decorative row of stone, glass and metal tiles, the stone of which matched our new floor tiles.
 I hit some more trouble on one of the side walls when I began relying more on the eyeballed vertically level nature of the tiles themselves and less on the carefully measured vertical line I'd drawn before starting the wall. By the time I reached the top the tiles were well inside the line. When I pointed out to the wife how strange this looked, she pointed out that I'd done it wrong. Fortunately, the mastic had not set and we were able to scoot the rows to the line, then cut new tile for the corner pieces.
The opposite wall, the one with the tub spout, valve handle and shower head, also proved a bit tricky, but nothing we couldn't tackle together.
By the time the basic surround was finished, we'd used four boxes of tile and had one full box remaining to take back to the tile store.
 The bullnose came in this weekend and we set about installing them. This became even trickier, because we only had around 72 pieces of it, leaving very little room for screw ups. Then, due to the screwups that then ensued anyway, we wound up using every last piece we had down to the scraps. We got it all in there, though, and it looks pretty darn good.
Now all we have left is the sealing of the tub, the grouting of the tile, the tiling of the floor, the grouting of the floor tile, some drywalling, the replacement of the ugly plumbing that will be exposed beneath the new sink vanity, the installation of said sink and vanity, the installation of the toilet, towel shelf and shower curtain and the painting.
The further along we get in this project, the less work we feel like doing on the hall bathroom. By the end, we'll probably be in a mood to slap some new paint on it and call it a day.


No comments:
Post a Comment